
Continuing Ed Topics: Pain

This post wraps up the current series of continuing education, although I’m sure the next time I need to renew my license, I’ll have another series of the same.

Today’s topic is a great one, from a human perspective, from a bodywork perspective—pain

Pain is such a complicated and fascinating facet of existence. The word ‘pain’ is derived from Greek and means punishment or penalty. The continuing ed class I took was slightly dated–from 2013 I believe–so it goes without saying that the statistics from the class have since been updated. Yet, I assure you, the sentiment is going to be the same.

Here are the stats compiled for that 2013 class:

  • Pain is the number one reason why people go see doctors, and also the most common reason for seeking out alternative and complementary treatments.
  • In 2011, the Institute of Medicine reported that 100 million Americans reported chronic pain and that the price tag associated with said pain, annually, was $635,000,000. You know that price has just gone up.
  • 100 billion aspirin tablets are used annually in the world.
  • The shape and color of pain tablets significantly change the effectiveness of the drug.
  • Here’s a fun one to ponder: people over 60 tend to have less pain than those under 60.
  • Talk therapy and back therapy both help with back pain…statistically about the same.
  • Pain was considered a spiritual punishment prior to the 1600s. Only then did Rene Descartes attribute pain to tissue damage.

This model of tissue damage being the only source of pain creates a wall when chronic pain is compared to acute pain. With acute pain, you can usually point fingers to the source of the issue. When you remove the issue, pain theoretically goes away. 

Chronic pain usually doesn’t have a straight line connecting multiple dots. It typically has many lines creating a crazy pattern, thus making this type of pain unpredictable. Even if you remove all that seems to be causing the pain, the pain may not resolve. (This also makes me think of how you can cure something but not heal it, and vice versa.)

These facts lead to a rather large and looming factor about pain: Pain is an illusion. (But so is reality, right???)

I’m not sure about you, but this one sits sort of -eh- with me. But… as stated in the course packet for the class I took, “Tissue damage is not necessary or sufficient for pain.” 

From a personal bodywork perspective, I cannot tell you how many times–almost on a weekly basis–people will present with the same feel of the tissue. It could be a tightness, a knot, a collection of aggravated muscles–but one client will be miserable and the other one will tell me s/he feels great.

You know how much I love the brain. A client and I were just talking about the pain impulse coming only from the brain and not from the tissue or affected area at all. What then? (Ok, we know this can’t be the only way, just like the other way isn’t conclusive, either.)

There’s a study from 2004 (Derbyshire) that states “Brainwave patterns in people who think they are receiving painful stimulus but aren’t are almost identical to brainwaves of people actually receiving painful stimulus”.

The plot thickens…

We’ve all heard about phantom limb pain… again… our friend, the brain.

Under this umbrella, it kind of does look like the brain is causing the pains and not the other way around! It’s receiving the sensory input from the affected area, but depending on context, the person receiving it, memory, cellular memory… only then does the brain decide whether or not the sensory input painful.

Here’s the thing. And I’m not going to go into the particular population that likes pain–that’s another topic–but for the most part, we don’t like pain. We stray away from it. We do things to keep ourselves from being in pain.

Pain often alerts us when something is WRONG and needs attention. It keeps us from making more damage by asking us to change our behavior (like touching something hot). It can activate healing by encouraging us to get care (massages, chiropractic, etc). 

But. Pain can stop being of use when it’s no longer necessary for those responses.

According to this class, it’s believed that that brain processes pain like an emotion. Whether or not something reads as good or bad is an emotional assessment. Apparently brain studies have suggested that the midbrain is affected when something is painful, much like an emotion affects the midbrain. Pain can also be activated by the upper brain–for instance, if anxiety is an issue, pain can be perceived as worse.

The point of the class, I think, is that by observation or learning about pain, pain can be changed. There are studies suggesting that those who are invested in studying pain have less of it. If you can understand where it is coming from, it can lose its hold on you (whether or not you still feel it).

Of course, there’s the issue of chronic pain leading to brain conditions like depression, hypochondria, aforementioned anxiety, lack of sleep, cognitive impairment among others… which of course… can make pain worse.

It’s a slippery slope. I think the best way to deal with pain from a bodyworker’s perspective is honestly just to be attentive to the needs of the client. Offer validation by listening to the client and then palpating the affected area. Hopefully the combination of hearing the client as well as actively working the tissue is enough to offer even a tiny part of relief as part of a whole care regimen.

Thoughts about your own pain?

In Closing

Interestingly enough, when I typed in pain to find an image suitable for this post, the first images were all of emotional pain! And because of this emotional pain, these people were tightened into balls…which restricts movement..which can cause physical pain!

I’ve also purchased additional textbooks on the matter, so don’t be surprised if I talk about this fascinating topic again.

Thanks for reading!
Continuing Ed Topics: Longevity for LMTs

I have to have a bunch of continuing education hours for massage therapy finished by the end of February, so I figured I’d pick a topic or two to dissect in the Swellness blog.

This week’s topic is licensed massage therapists themselves — “principles of longevity”. In other words, how to make your career last longer than the typical 5 years or less for therapists. (Now, having said that, I do know plenty of people who have practiced much longer, including myself!)

Let’s talk alarming statistics, and please note — these stats are at least 10 years old! 77% of massage therapists experience musculoskeletal issues due to the nature of their work. About 40% get diagnosed with an official issue, and 20% have to take time off because of said injury. I think this explains why therapists tend to turn to other types of work after the 5-year mark.

I have certainly injured myself due to the nature of the work. I’ve tweaked my back, my shoulders, my hips, my arm, and my thumb. And that’s just off of the top of my head! I’ve never turned down a massage because of the injuries, but I’ve also sighed some relief while injured when realizing some of my appointments are Reiki and not massage! 🤪

Tips for Massage Therapists to Lengthen Their Careers

  1. Use less oil. Think about it: if you use too much oil, there’s easier glide on the body you’re working on. Less oil means more resistance, which means it’s easier to use your bodyweight as a tool in your practice. Otherwise you’re flopping around, finding zero stability.
  2. Create a friction point while doing cross-fiber techniques. Drape an arm across another arm to create the fulcrum! Think smarter, not harder!
  3. Saw the jaw with the palms of your hands rather than jabbing it with your thumbs. Aye! This is definitely something I plan on doing. I do jaw work on a client I see monthly. I bet the sawing method feels good, too. Anyone want to try it on me???
  4. Rock your client’s hips into the fist of a hand you are using. Great idea!
  5. Use a forearm to press a foot bottom into the fist of your other hand. I just tried this last night on my kid. He’s obsessed with foot massages.
  6. “Save your wrist, use a fist!” Yes, yes, I think LMTs already know this one.
  7. Use your patellar tendon as a massage tool, or knees in general to glide along quads, hamstrings, lower backs and hips. Apparently this isn’t as hard as it sounds, but I have yet to try it.
  8. TOOLS. Get them. Use them. I definitely need a thumb saver tool, I honestly don’t know why I haven’t tried one yet.

Happy massaging!

Got a Covid Vaccine and it Hurts? Here’s What I Did.

Ouch!

Did you decide to go ahead and get the vaccine, and are in a ton of pain?

As a licensed massage therapist, someone who gets allergy shots, and in general, a pain-person, I am no stranger to muscular issues.

I got stuck by the giant vaccine needle in my right deltoid (that’s the triangular muscle rounding the shape of your shoulder) and while the moment of impact wasn’t that bad, that evening and following day/evening I could barely move it.

I iced it the second night — I tend to try to let my body use its natural defenses without any outside help at first (I know what you’re thinking — how interesting to read, considering I literally just said I got vaccinated — well, I hope, but that’s another story for another blog!), and the ice instantly helped reduce inflammation, as well as interrupting my pain sensors.

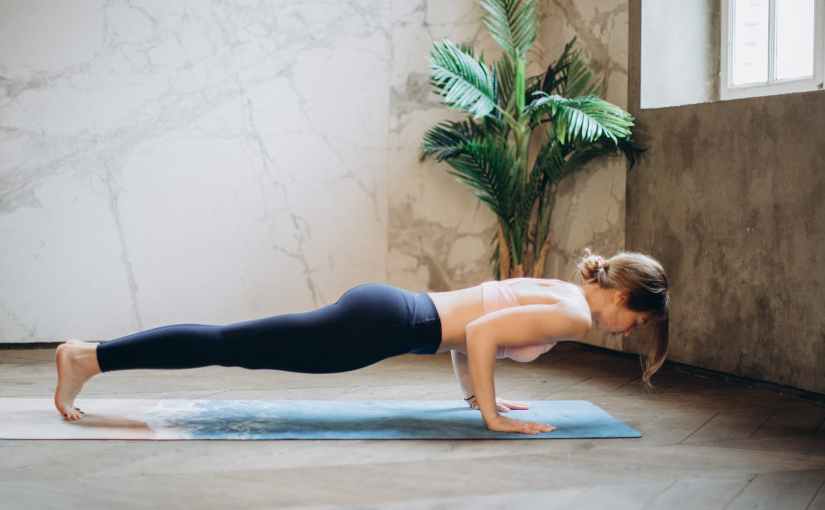
But that first day and night, I made sure to MOVE it, to keep those muscle fibers as stretched out as possible, to get that blood flowing! Now, I didn’t overdo it — but every so often, I did some chaturangas and up-dogs. (Did I mention I also took yoga training?) It kept my arm from getting too stiff.

That night I tried to keep it above my head when I slept, but I’m not going to lie – it was hard to sleep. The following day as the pain got even worse, I continued to intermittently do exercises to remove the blocked energy.

The second evening, I engaged in about 30 minutes of yoga practice. Rather than just popping on the floor for a push-up or two, I did some light vinyasa, flowing from chaturanga, to up-dog, to down-dog, and included some warrior poses. Child’s pose, chaturanga and up-dog felt the best on my arm — but it started to get tired and super sore, and so I was worried I had overdone it.

So before bed, this is why I put ice on my arm.

I had similar issues as the first night of sleep — sore as hell, tried not to lie on it.. but when I woke up the next day, I could lift my arm above my head no problem.

Running into it still hurts (!), but I really think that second night of more vigorous stretching helped me out.

So my official recommendation, based on what worked for me? Use ice and light stretching the first day; the second day, do a more vigorous flow, wait about thirty minutes, and then add ice again. This is assuming you already know the basics of yoga, and are physically able to engage in the following positions (or modifications thereof).

Always consult a doctor before starting a new exercise regimen!

Now that we’ve gotten through that, here’s the brief yoga practice I did:

Sit in a comfortable cross-legged seated position – sukhasana. You can sit on a yoga mat, towel or blanket. You can even prop your hips up a bit if you’d like to roll up your blanket. Lift your chin so it’s parallel with the floor, drop your shoulders down as you press your chest forward, lifting off of your waist. Stretch your arms out, and try to cup your hands over your knees for a gentle stretch. You should feel a slight pull in your arms, especially as you sit back onto your bum.

If anything is ever too uncomfortable, stretch less and relax your muscles and do a modified version of the pose. You can do gentle head lifts by painting a line with your nose down, stretching out the back of your neck, and then walking your gaze along the ceiling, bending your elbows as you do so. Straighten your arms back out as you look down. Do this for a few breaths, taking your time. Move slowly and with purpose.

From sukhasana, gently release the posture and walk yourself into table-top position. Release your palms down to the earth, bending the elbows slightly as you walk your legs back, bringing your hips over the knees. Start to straighten your arms, lifting off of the floor as you press down into the mat. Press into the tops of your feet.

Then press your hips back onto your heels for child’s pose, stretching your arms out long in front of you, palms pressing into the mat, arms slightly lifted. If this is uncomfortable, you can bend at the elbows for a more relaxed stretch. Breathe into the stretch, wiggling your arms gently from side to side, feeling a tug in the arm muscles. Press your forehead gently into the mat.

From child’s pose, make your way into downward facing dog. With your feet hip distance apart and arms shoulder distance apart, press your hips up to the sky in an upside down V with your feet gravitating towards the floor. With your palms pressing into the floor, curl your fingers a bit to take pressure out of your wrists, but make sure you arms are nice and long. Rotate your biceps forward to open your shoulders and release tension in the back and neck. Your gaze is gently focused on the fronts of your knees. Lengthen as you lift, exhale and deepen. Wiggle back and forth if you need to, working out the tension in your sore shot arm.

From downward facing dog, move forward into a plank position. No longer forming an upside down V, you’re going to have your shoulders directly over your arms. Keep your bum lifted a bit, hugging into the core. Gaze is at the floor. Hold the pose, feeling strong. Press the heels back. When you’re ready, begin to bend the arms into chaturanga, push-up position.

Breathe naturally, but breathe slowly, extending your inhalations and exhalations with each movement.

Once you are down onto the mat, lift up into up-dog, pressing into the mat. elongating your arms. Lift your legs off of the mat if you can, pressing into the tops of your feet. Press the heart forward, feeling strong.

BREATHE.

Untuck the toes, pressing yourself back into another plank.

From here, you can repeat, going back and forth into up-dog and plank, or take a breather, pressing into down-dog. You can also go back into a child’s pose. Flow between the positions until your arm gets slightly tired, and then rest completely into child’s pose with your arms behind you, palms facing up, or savasana, flat on your back.

Breathe into the uncomfortableness of your arm, and feel the energy and blood move!

Most of all: ENJOY!